Back to Planned Maintenance Main Menu
Although there are 18 steps on the schedule creation form, you only need to fill out a few to start creating beneficial schedules in your account. Here we'll cover the basic required and recommended steps for entering your PM schedules quickly. You can always come back to add more information to your schedules as needed. Please call the Client Service Center if you have any questions.
Click on the New Schedule tab at the top of your screen.

Step 1: Enter PM Schedule Title
This is a required step. Enter a Title for this schedule. You want to be as specific as possible when naming your schedules. Example: Enter the initials or abbreviation of the location, the classification or type, and the frequency (Admin-AHU-Quarterly). Click Next Step. *Note: Avoid using special characters, such as &, *, and @, in your PM Titles. However, it is acceptable to use spaces, dashes, and underscores.
Step 2: Select Classification
This is a required step. You must select the classification of equipment or building system for the schedule you are entering. Your screen will automatically refresh to the next step.
Step 3: Select Type
This step is not required, but recommended as it helps you narrow the definition of the work that needs to be done. The Classification selected in Step 2 is usually a broad term and the Types in Step 3 are subcategories of those classifications. You may want to select a Type depending on the schedule you are creating. Click on Step 5.
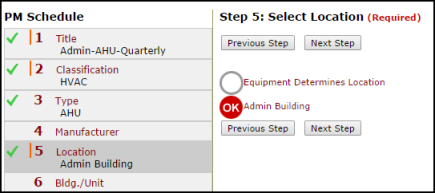
Step 5: Select Location
Select the specific location where this PM work will be performed. This is helpful to use when you have multiple locations that need separate work orders. Your screen will automatically refresh to the next step; click on Step 11.
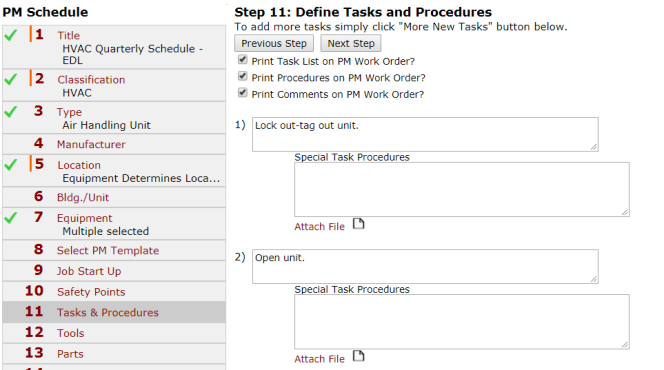
Step 11: Define Tasks & Procedures
Enter the tasks needed to complete this job. You can also click Attach File below the Special Task Procedures box to attach a document. *Note: If you attach a document, it is best practice to add a task that indicates the user needs to open the attachment. This way, it stands out to the user completing the tasks. Use the checkboxes to determine if you would like the Task List, Procedures, and Comments to show on the printed PM work order. Click Next Step to save. Then click on Step 16.
 r
r
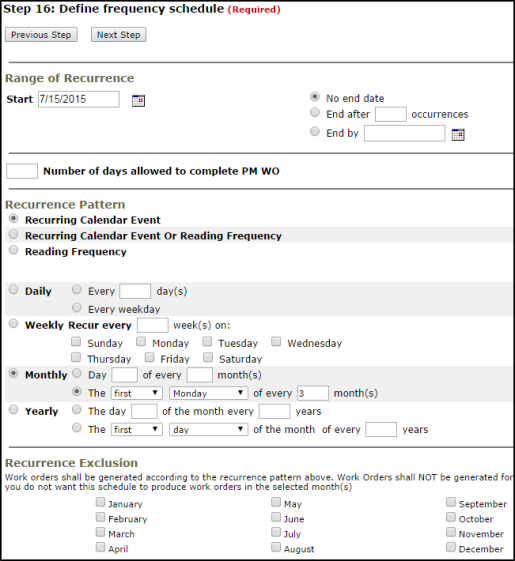
Step 16: Define Frequency
This is a required step. You must select how often you would like this schedule to generate a PM work order.
In the Range of Recurrence field, enter the date you want the schedule to start generating PM work orders. If this is a temporary schedule, you can set an End Date to the right of the Range of Recurrence.
Select the Recurrence Pattern for your schedule. We recommend Recurring Calendar Event. You can select Daily, Weekly, Monthly, or Yearly options:
- Daily - Select either Every (_) day(s) or Every Weekday. Example: For work that needs to be done every day including weekends, enter Every (1) day.
- Weekly Recur every (_) week(s) on (day(s) of the week). Example: For work that needs to take place every other Monday, enter Weekly Recur every (2) weeks with a check mark in the box next to Monday.
- Monthly
- Day (_) of every (_) month(s). Example: For work that needs to take place on the 15th day of every month, enter Day (15) of every (1) month.
- The (first) (Monday) of every (_) month(s). Example: For work that needs to be done on the first weekday of every quarter, enter The (first) (weekday) of every (3) months.
- Yearly
- The day (_) of the month every (_) years. Example: For work that needs to take place on October 15th every year, enter The day (15) of the month every (1) years, and then set your Range of Recurrence to October 15th.
- The (first) (day) of the month of every (_) years. Example: For work that will be done on the first weekday in May every other year, enter The (first) (weekday) of the month of every (2) years, and then set your Range of Recurrence to May 1st.
For information about setting up a schedule based on Reading Frequency, click here.
If this is a seasonal schedule, you can select which months you would like to skip the work order generation in the Recurrence Exclusion section. Put a check in the boxes next to the months that you do not want a work order to be created.
Click Next Step to save.
Step 18: Setup Schedule Now
This is a required step and the final step to creating your schedule. It shows the selections you made on the schedule. Make sure these selections are correct, and then click Setup Schedule Now. This schedule is now an active running schedule that will create PM work orders in your Work Order account.

